The full AI-to-Webflow workflow
The Converter on its own is useful. Combined with the rest of BYQ, it becomes the closing piece of a workflow that turns AI prompts into real Webflow projects. This chapter walks through what that full loop looks like — and why the pieces work better together than apart.
The loop, step by step
- Pick a template’s Design System on the Design Systems page.
- Download its DESIGN.md file.
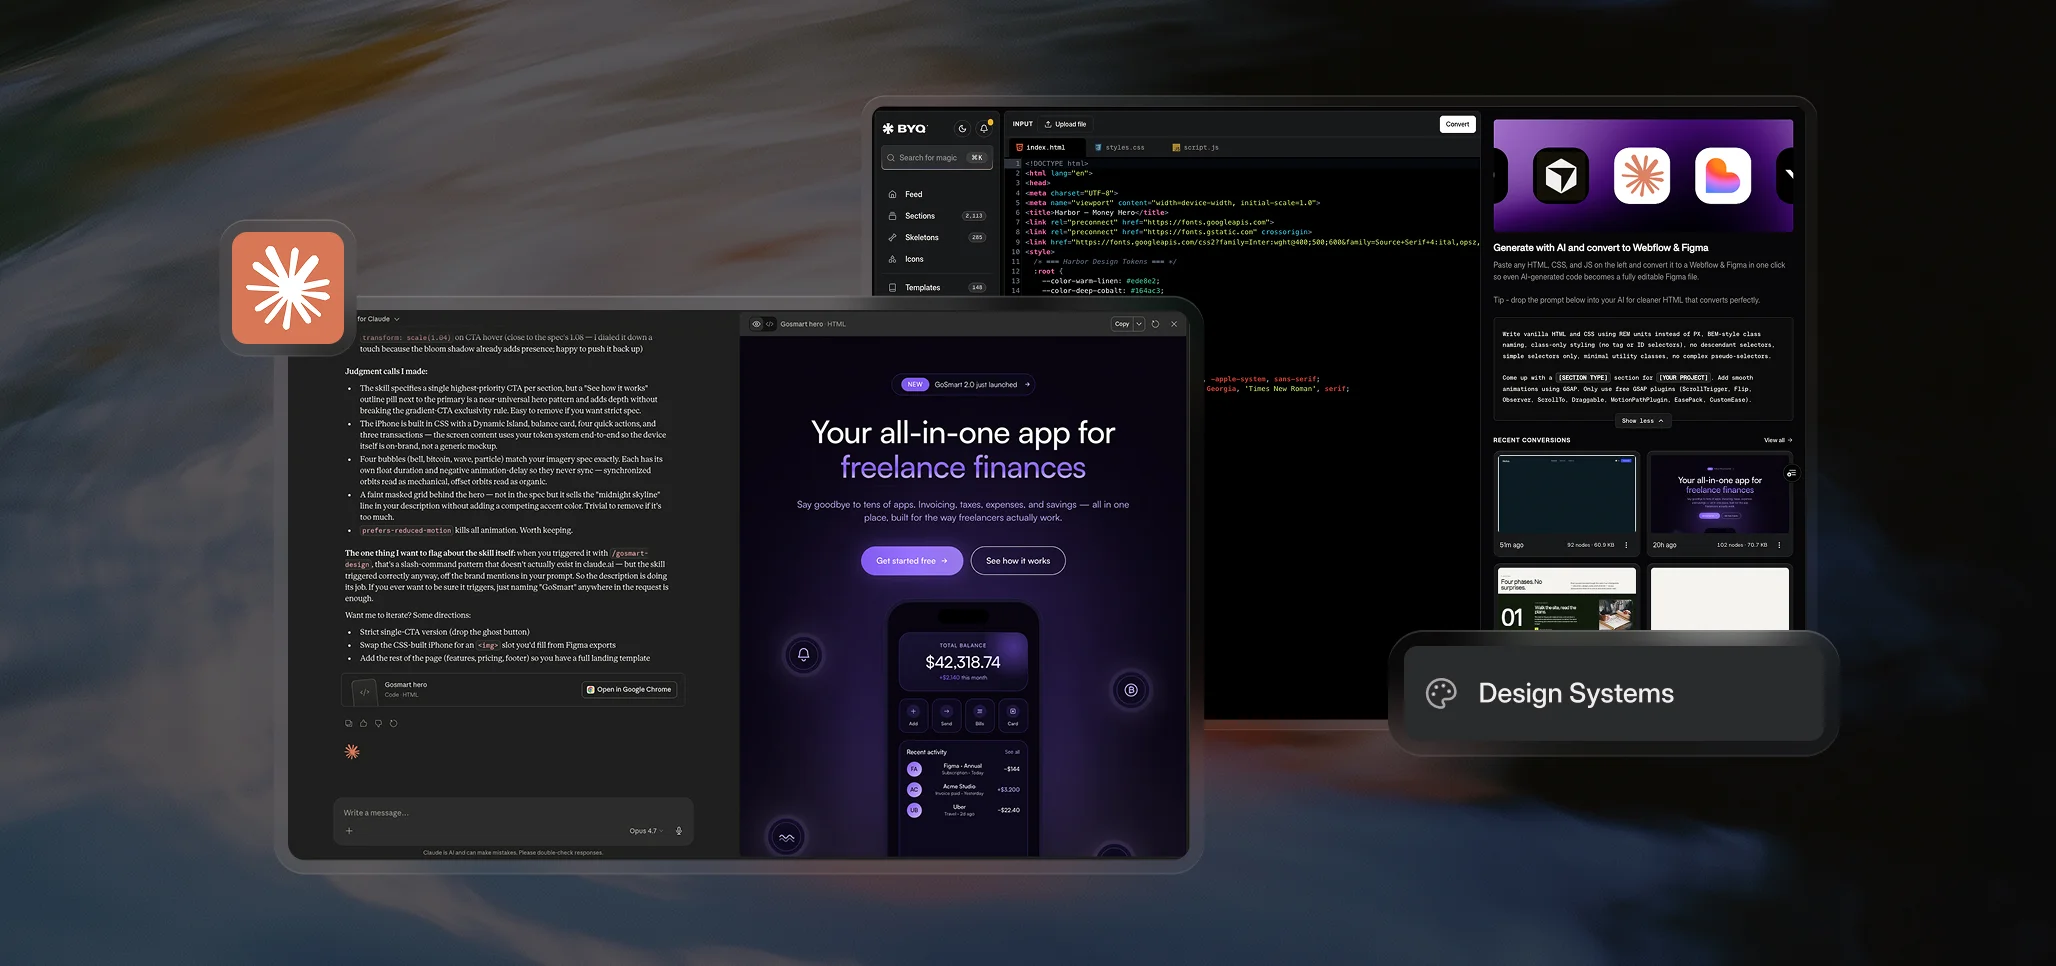
- Open your AI tool of choice — Claude, ChatGPT, Lovable, v0, Cursor.
- Attach DESIGN.md so the AI knows the visual language of the template.
- Add the example Converter prompt so the AI produces code that converts cleanly.
- Describe the section you want — “a pricing section with three plans,” “a hero with a product mockup on the right,” “a testimonial row with avatars.”
- Iterate until the HTML output looks right.
- Open the Converter.
- Paste the AI’s HTML, CSS, and JavaScript into the code editor. Or paste the whole single file into the [class]index.html[/class] tab — the Converter will split it automatically.
- Click Convert.
- Copy to Webflow from the preview popup.
- Paste into a fresh Webflow project to verify everything looks right.
- Paste into your real project and continue building.
The whole loop, from “I want a section” to “the section is in my Webflow project,” can take well under an hour.
Why this loop works
Each piece of the loop solves a problem the others can’t:
- AI tools are fast at generating layouts but produce generic-looking output by default and don’t speak Webflow’s structural language.
- Design Systems give the AI a visual identity to follow, so the output stops looking generic and starts looking like a premium template.
- The Converter translates the AI’s output into native Webflow structure, so you don’t have to rebuild it manually.
- Webflow is where you actually build, ship, and maintain the site.
Skip any one of these and the workflow gets harder. Use them together and what was a multi-hour rebuild becomes a fifteen-minute paste.
A worked example
Here’s the flow as it might actually go:
- You’re building a marketing site for a fintech product. You want a hero with a calculator on the right side.
- You browse BYQ and land on the Harbor template — clean, editorial, fintech-feeling. You download its DESIGN.md.
- In Claude, you attach DESIGN.md and the Converter prompt. You say: “Build a hero section for a cross-border payments product. Left column: headline, supporting paragraph, two CTAs. Right column: a currency exchange calculator with input fields, an exchange rate display, and a ‘Send money’ button.”
- Claude generates the section. You iterate twice — tighten spacing, swap one accent color.
- You paste the full HTML into the Converter. Click Convert.
- You copy to Webflow and paste into a fresh project to check. Looks right.
- You copy from the fresh project into your real Webflow site. The section lands as native elements, the calculator card is fully editable, the typography matches Harbor, the colors are right.
- You spend ten more minutes adjusting class names to fit your project’s conventions and you’re done.
That entire flow — from picking a template to having a live, editable Webflow section — took less time than it would have to design the calculator card from scratch in Figma.
Realistic expectations
This loop is powerful, but it’s not magic:
- You’ll still iterate with the AI. First attempts rarely match exactly what you want. Expect two to four rounds of prompting before the output is right.
- You’ll still adjust in Webflow. Class names from AI output won’t perfectly match your project’s existing conventions. Expect a small cleanup pass.
- Animations may need previewing. Anything driven by JavaScript embeds as custom code and won’t render in the Designer. Preview with custom code enabled or publish to staging to see the real thing.
- Not every section converts to 100% native elements. Some will land with embedded code blocks. That’s expected, not a failure — see How the Converter works for what to expect.
What the loop gives you is speed and a consistent starting point. What you bring is judgment, polish, and the integration into your specific project.
When to use which entry point
Not every project starts with a Design System. A few common entry points:
- You want a section in the style of a specific template → start with that template’s Design System, then go through the full loop.
- You have a screenshot or design reference you want to recreate → attach the screenshot to your AI tool along with DESIGN.md and the Converter prompt, and ask the AI to build that layout in the template’s style.
- You have AI-generated code from somewhere else → skip the Design System and prompt steps, go straight to the Converter. You’ll lose the visual consistency but the Converter still works on any clean HTML/CSS/JS.
- You’re prototyping fast and don’t care about template fidelity → just use the Converter prompt by itself (no Design System), generate something quick, and convert.
The full loop is the most opinionated path. Each shorter version is also valid.
Where this fits in the bigger picture
The Converter is one piece of the AI-ready toolkit we’re building on BYQ. Design Systems, the Converter, and the existing libraries (Sections, Skeletons, Templates) are all designed to work together — each solving a different part of the gap between “I have an idea” and “the site is live.”
We’ve gathered the full picture under Build with AI. If you’ve worked through the Converter docs, that track ties everything together.