From the Converter to your project
Once you’ve clicked Convert and you’re looking at the preview popup, you have two buttons in the top right: Copy to Figma and Copy to Webflow. Both put a native version of your section onto your clipboard — Webflow elements for one, Figma layers for the other. From there it’s just paste.
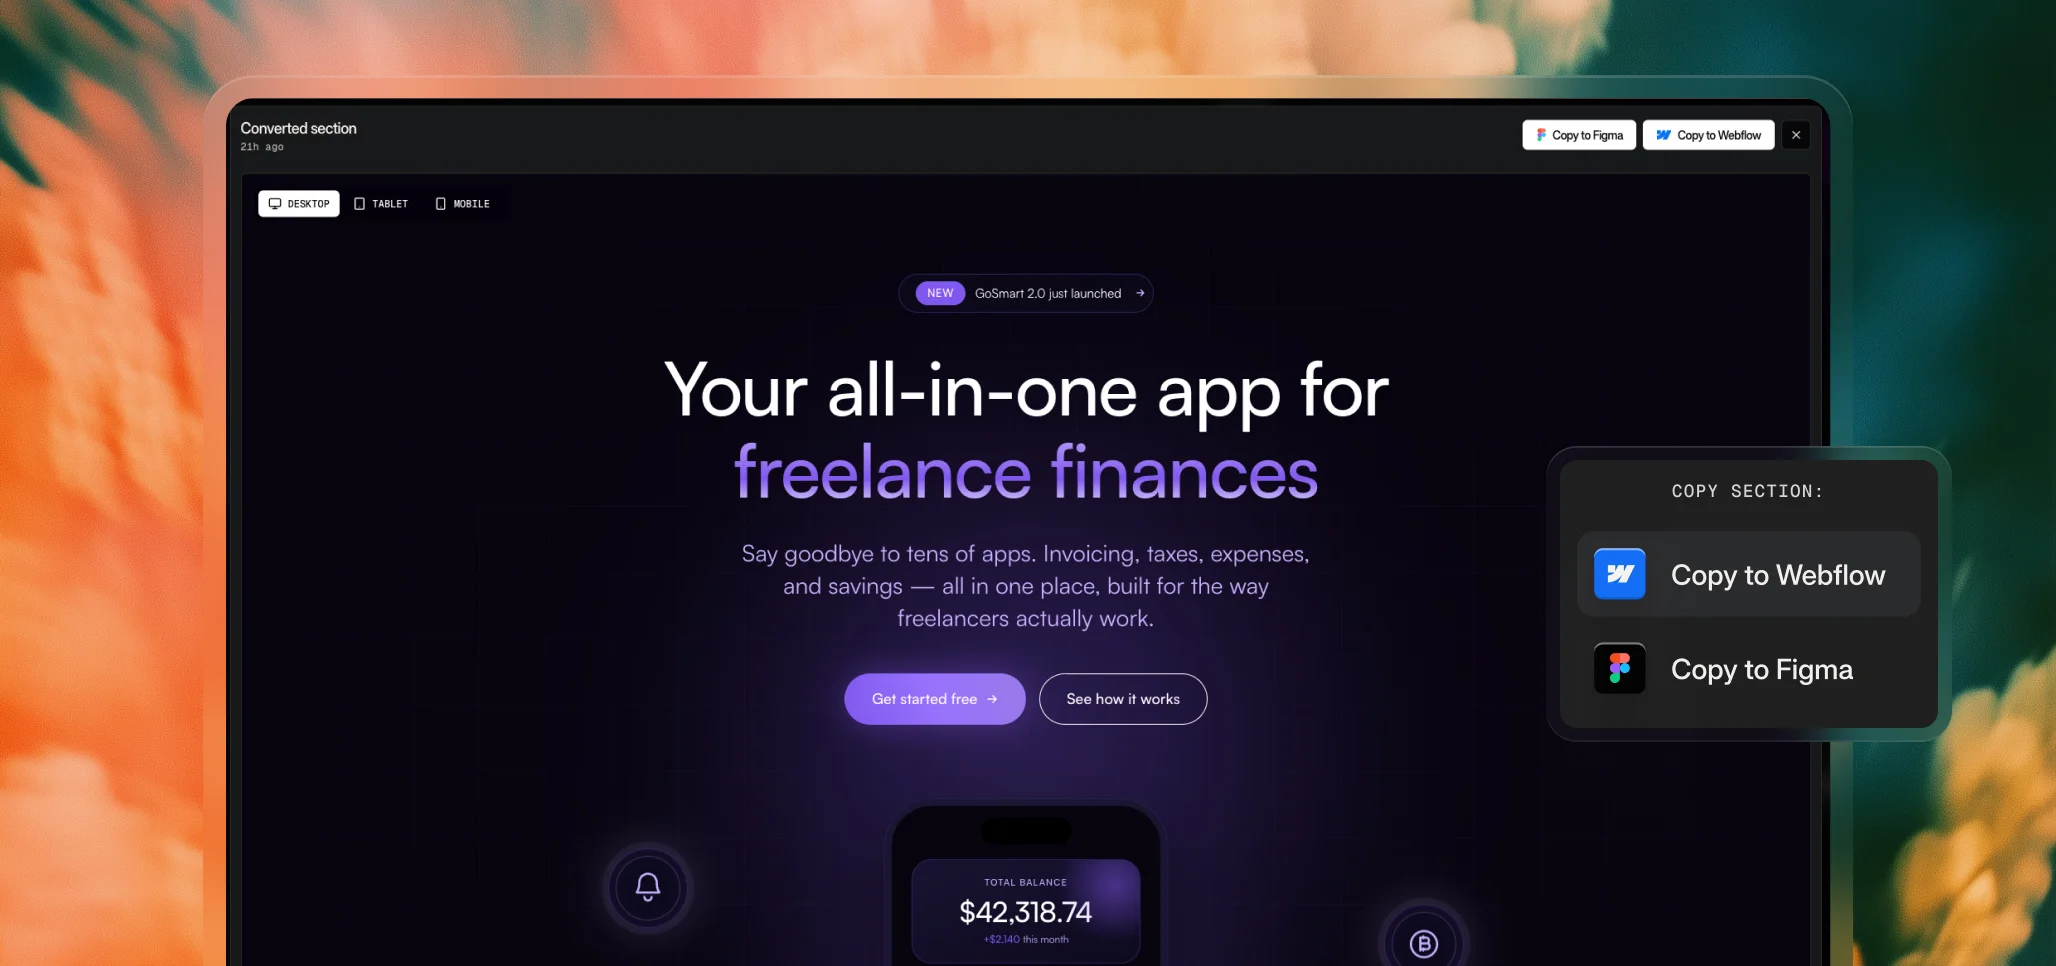
Copying to Webflow
- Click “Copy to Webflow” in the preview popup.
- Open Webflow and navigate to the project you want to use.
- Open the Designer and click into the page where the section should land.
- Paste with [class]Cmd + V[/class] (Mac) or [class]Ctrl + V[/class] (Windows).
- The section appears as native Webflow elements — divs, headings, buttons, images, and all the styles wrapped in real Webflow classes.
You can now edit the section the same way you’d edit anything you built by hand: change text, swap colors, adjust spacing, restyle classes, add interactions. Everything that converted natively is fully editable in the Designer.
Anything that came through as embedded custom code (JavaScript animations, certain advanced styling) will appear as an Embed element inside the section. It runs on the published page but won’t render in the Designer view. See How the Converter works for the full picture on why that happens and how to preview properly.
Copying to Figma
- Click “Copy to Figma” in the preview popup.
- Open Figma and the file you want to paste into.
- Paste with [class]Cmd + V[/class] (Mac) or [class]Ctrl + V[/class] (Windows).
- The section appears as real Figma layers — frames, text nodes, fills, images.
From there, treat it like any other Figma design. You can rename layers, restructure frames, swap colors via local styles, replace images, and build around it as part of a larger file.
Figma output won’t include JavaScript-driven animations or interactions — those don’t exist in Figma’s design model. What you get is the clean static visual of the section, which is usually what you want when you’re using the Figma path.
Always paste into a fresh project first
This is the single most important habit to build when using the Converter, especially for Webflow.
The Webflow Designer is sensitive to certain structural patterns, and while the Converter handles most of them gracefully, it cannot guarantee compatibility with every possible piece of AI-generated code. In rare cases, pasting a converted section into a complex existing project can cause the Designer to crash or behave unexpectedly.
The fix is simple and takes about ten seconds: paste into a fresh, empty Webflow project first.
- Create a new empty Webflow project (or keep a dedicated “Converter testing” project around for this).
- Paste your converted section into it.
- Check that it loads correctly, renders properly when previewed with custom code enabled, and looks the way you expect.
- If everything looks good, copy the section from the fresh project and paste it into your real project.
This isn’t paranoia — it’s the standard practice we recommend to everyone. The cost is a few seconds. The benefit is never having a converted section corrupt the project you’ve spent weeks building. Treat it like saving before a risky operation.
For Figma, the same principle applies but the stakes are much lower — Figma handles unexpected paste content well, and there’s no equivalent crash risk. You can paste directly into your real Figma file if you want, though pasting into a scratch file first is still a reasonable habit.
Re-using past conversions
Every conversion you run is saved to your Recent Conversions on the Converter page, indefinitely. If you want to bring an older section into a new project — or copy the same section to both Webflow and Figma — you can open any past conversion and re-copy it.
This is especially useful when you’ve already done the work of generating, converting, and verifying a section, and you want to use it again somewhere else without re-running the whole flow.
What if something doesn’t look right?
If the section pastes into Webflow and something looks wrong, the most common causes are:
- The section is using custom code embeds that don’t render in the Designer. Try Preview with custom code enabled, or publish to staging.
- The section’s classes are colliding with existing classes in your project. This happens more in long-lived projects with many existing classes. Pasting into a fresh project first surfaces this immediately.
- The original code had something the Converter couldn’t translate cleanly — usually exotic CSS, framework markup, or heavy JavaScript. See Writing code that converts well for what to ask the AI for next time.
If a conversion produces unexpected results consistently, it’s worth re-generating with a cleaner prompt (or a clearer code structure) and converting again. The Converter is in beta, and we’re continuously improving how it handles edge cases — but feeding it cleaner code is always the fastest path to a cleaner result.